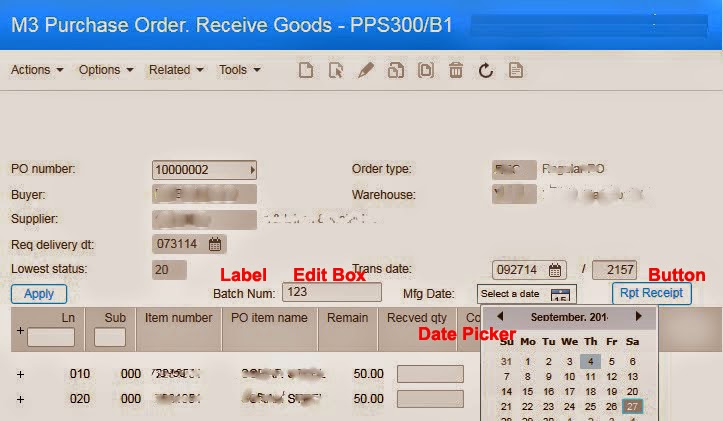
Button
Buttons can be used for various activities such as,
1. Call actions or related options with additional validations
2. Call an API and fill some data
3. Load some data from a text file and load them to a list view
4. Call SQL (Not recommended)
5. Automate a form and etc…..
Normally we use a button for a user driven activity and therefore initial triggering point would be the users’ click. Initializing of a button can be done by the following code,
var NameOfButton = new Button();Once initializing a button, we need to set button properties such as name, span, alignment, controls and finally we need to add that to the current controller.
//Name you want to show in the button
NameOfButton.Content = 'Click Me!;
//tooltip to give a basic understanding on what it does.
NameOfButton.ToolTip = 'Click here to automatically report pallets';
//set horizontal alignment and span of the button on the grid
NameOfButton.HorizontalAlignment = HorizontalAlignment.Left;
Grid.SetColumn(NameOfButton, 60);
Grid.SetColumnSpan(NameOfButton, 98);
//set vertical alignment and span of the button on the grid
NameOfButton.VerticalAlignment = VerticalAlignment.Top;
Grid.SetRow(NameOfButton, 6);
Grid.SetRowSpan(NameOfButton, 23);
//add this button to the current controller. This is one of most important task of the process. If you don’t add that to the current controller you want be able to see this button on your grid.
controller.RenderEngine.Content.Children.Add(NameOfButton);
//finally adds an event to this button. This will be responsible for handling events for this button.
NameOfButton.add_Click(OnClick_NameOfButton);
Once the button is constructed, we are good to design the click event which does the work for this button. Ok let’s see how we can create “OnClick_NameOfButton” event.
function OnClick_ NameOfButton (sender: Object, e: RoutedEventArgs) {
  debug.WriteLine("clicked");
  var puno = ScriptUtil.FindChild(content, "WWPUNO");
  RetrivePODataForPONum(puno);
}
This would capture the user click and do the task for the user. Using this method you can call any method so easily.Text Box
In some scripts we need to get some input value from the user. In that case we can use text box. As previous, first you need to initialize the object and then define respective properties as required.
//initialize the object
var EditBoxName = new  TextBox();
//if you want to set default value, you can set it here
 EditBoxName.Text='';
//set width, height and font size. Note that we can uses cell width and height from the configuration itself.
 EditBoxName.Width= 10* Configuration.CellWidth;
 EditBoxName.Height= 15;
EditBoxName.FontSize = 12;
//set vertical/horizontal alignment with span and size.
EditBoxName.HorizontalAlignment=HorizontalAlignment.Left;
Grid.SetColumn(EditBoxName,20);
Grid.SetColumnSpan(EditBoxName,20);
EditBoxName.VerticalAlignment=VerticalAlignment.Top;
Grid.SetRow(EditBoxName,row);
Grid.SetRowSpan(EditBoxName,23);
//Finally add this to the grid
controller.RenderEngine.Content.Children.Add(EditBoxName);
Once you define a variable for the edit box you can read the editable text for processing using following property.
EditBoxName.Text
Label
You can add non editable text to M3 using labels as follows.
//initialize the vareable
var labelName = new Label();
//set the name
labelName.Content = name;
labelName.Padding = new Thickness(1);
//set label on the grid
Grid.SetColumn(labelName, col);
Grid.SetRow(labelName, row);
Grid.SetColumnSpan(labelName, 12);
//attach to the current controller
controller.RenderEngine.Content.Children.Add(labelName);
Date picker
You can also use data picker in a jscript by using following simple code.
// initialize the variable
var variable = new DatePicker();
//set width/height
variable.Width= 10* Configuration.CellWidth;
variable.Height= 20;
variable.FontSize = 10;
//set date picker on the grid
Grid.SetColumn(variable, col);
Grid.SetRow(variable, row);
Grid.SetColumnSpan(variable, 11);
//attach the date picker to the current controller
controller.RenderEngine.Content.Children.Add(variable);

No comments:
Post a Comment