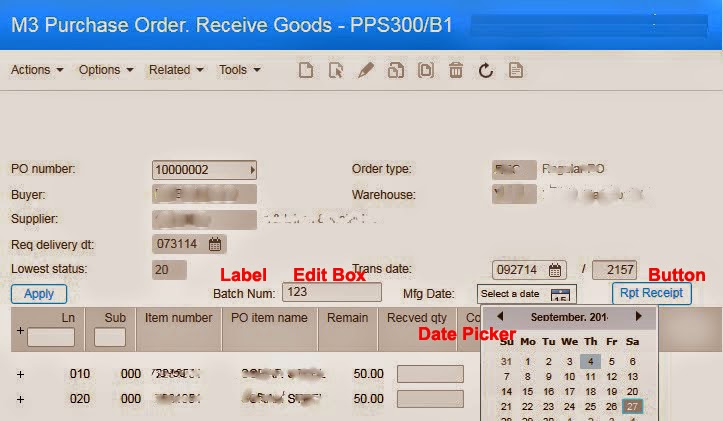
Thursday, November 6, 2014

Add buttons / Text box / Label / Date picker to a panel.

We can add various controllers to M3 user interface using JScripting. Today I’m going to show some simple mechanisms you can use to add a button, label, and editable text box.


Button 

Buttons can be used for various activities such as,
           1. Call actions or related options with additional validations
           2. Call an API and fill some data
           3. Load some data from a text file and load them to a list view
           4. Call SQL (Not recommended)
           5. Automate a form and etc…..

Normally we use a button for a user driven activity and therefore initial triggering point would be the users’ click. Initializing of a button can be done by the following code,
 var NameOfButton = new Button(); 
Once initializing a button, we need to set button properties such as name, span, alignment, controls and finally we need to add that to the current controller.
//Name you want to show in the button
NameOfButton.Content = 'Click Me!;
//tooltip to give a basic understanding on what it does.
NameOfButton.ToolTip = 'Click here to automatically report pallets';
//set horizontal alignment and span of the button on the grid
NameOfButton.HorizontalAlignment = HorizontalAlignment.Left;
Grid.SetColumn(NameOfButton, 60);
Grid.SetColumnSpan(NameOfButton, 98);
//set vertical alignment and span of the button on the grid
NameOfButton.VerticalAlignment = VerticalAlignment.Top;
Grid.SetRow(NameOfButton, 6);
Grid.SetRowSpan(NameOfButton, 23);
//add this button to the current controller. This is one of most important task of the process. If you don’t add that to the current controller you want be able to see this button on your grid. 
controller.RenderEngine.Content.Children.Add(NameOfButton);
//finally adds an event to this button. This will be responsible for handling events for this button.
NameOfButton.add_Click(OnClick_NameOfButton);
Once the button is constructed, we are good to design the click event which does the work for this button. Ok let’s see how we can create “OnClick_NameOfButton” event.
function OnClick_ NameOfButton (sender: Object, e: RoutedEventArgs) {
  debug.WriteLine("clicked");
  var puno = ScriptUtil.FindChild(content, "WWPUNO");
  RetrivePODataForPONum(puno);
} 
This would capture the user click and do the task for the user. Using this method you can call any method so easily.

 Text Box 
In some scripts we need to get some input value from the user. In that case we can use text box. As previous, first you need to initialize the object and then define respective properties as required.
//initialize the object
var EditBoxName = new  TextBox();  
//if you want to set default value, you can set it here               
 EditBoxName.Text='';
//set width, height and font size. Note that we can uses cell width and height from the configuration itself.
 EditBoxName.Width= 10* Configuration.CellWidth;
 EditBoxName.Height= 15;
EditBoxName.FontSize = 12;  
//set vertical/horizontal alignment with span and size.
EditBoxName.HorizontalAlignment=HorizontalAlignment.Left;
Grid.SetColumn(EditBoxName,20);
Grid.SetColumnSpan(EditBoxName,20);
EditBoxName.VerticalAlignment=VerticalAlignment.Top;
Grid.SetRow(EditBoxName,row);
Grid.SetRowSpan(EditBoxName,23);      
//Finally add this to the grid
controller.RenderEngine.Content.Children.Add(EditBoxName);
Once you define a variable for the edit box you can read the editable text for processing using following property.
 EditBoxName.Text 

Label

 You can add non editable text to M3 using labels as follows.
//initialize the vareable
var labelName = new Label();
//set the name
labelName.Content = name;
labelName.Padding = new Thickness(1);
//set label on the grid
Grid.SetColumn(labelName, col);
Grid.SetRow(labelName, row);
Grid.SetColumnSpan(labelName, 12);
//attach to the current controller
controller.RenderEngine.Content.Children.Add(labelName);

Date picker 

You can also use data picker in a jscript by using following simple code.
// initialize the variable
var variable = new DatePicker(); 
//set width/height
variable.Width= 10* Configuration.CellWidth;
variable.Height= 20; 
variable.FontSize = 10;  
//set date picker on the grid
Grid.SetColumn(variable, col);
Grid.SetRow(variable, row);
Grid.SetColumnSpan(variable, 11);
//attach the date picker to the current controller
controller.RenderEngine.Content.Children.Add(variable);

Thursday, October 2, 2014

Hello M3 Jscript World!!

Hello Friends,

It is really easy to start with jscripting in M3. Just open your jscript tool (Refer my previous blog for more details) Once you are done with that go to File -> New Script and create new script. It will generate the basic class structure for you. If you want to read a field in a M3 panel, you can use following code snippet.

var OType=ScriptUtil.FindChild(content, "QOMAUN");

You can use properties like, 1. Text – to view the field text. 2. IsEnabled (Boolean) – to enable/disable a field. If you want to give view (non-editable) access to a user for a filed, you can set “IsEnabled” property to “false”.

import System;
import System.Windows;
import System.Windows.Controls;
import MForms;

package MForms.JScript {
   class HelloWorld {
   
   var content;
   var controler;
   var debug;
   
      public function Init(element: Object, args: Object, controller : Object, debug : Object) {
         debug.WriteLine("Hello World!.");
         
         this.content = controller.RenderEngine.Content;
         this.controler = controller;
         this.debug = debug;
         
         var OType=ScriptUtil.FindChild(content, "QOMAUN");
          
   debug.WriteLine("Hello Field - "+ OType.Text + ", let me dissable you");
   
   //OType.IsEnabled = false;
   DisableField(OType);
   
      }
      
      public function DisableField(fieldObj){
        fieldObj.IsEnabled = false;
        debug.WriteLine("Dissabled!! ");
      }
   }
}

Saturday, September 27, 2014

How to test Jscript in the Local machine for Lawson/Infor M3

You can test your jscript for Infor M3, using your local machine in 2 different ways.

1.  Using in-build script tool
2.   By configuring regedit of your local machine

1.  Using in-build script tool 

Step 1 – Type “mforms://jscript” in the start/search box on the title bar. And press enter
Step 2 – Once you open the script tool you can either,
open your script from a local folder (File -> Open)
 OR
copy and paste the code on the script tool.
Step 3 – Open the panel you want to check the personalization for. (Ex – PDS010/B) Then hit “Refresh” button on the Script tool. Once you do so, you can select the relevant panel (communicate with the programmer and verify the correct panel to start with) from the drop down before the “Refresh” button.

Step 4 – Once you are done with the above, press “Run” button on the script tool.
Step 5 – Go to the panel which you select as the host for the script and test the personalization.

Note – This will be effective until you close the selected panel or program. If you want to test it with different scenarios with one time attachment, it is recommended to use the second method.

2.  By configuring regedit of your local machine

Using this mechanism you can test you personalization only by opening the program each time. You don’t have to configure or run special program after that.
Step 1 – Download the following zip file and unzip it. Just double click it to run the registry file. Allow the registry file to run. Please select the correct zip file as per the M3 version. Once you get the success message please proceed with next step.
AuroraDeves_v13
AuroraDeves_v10

Step 2 – Create a new folder “C:\Aurora_Devs\Script\” in your c: drive
Step 3 – Copy and paste the jscript to that folder.
Step 4 – Open LSO and go the relevant program you wanna check the jscript. (Ex- PPS300/B)
Step 5 – Go to Tools -> Personalize-> Script

Add the script name (except .js) and press “Add”

Once you attach the jscript always remember to hit “Save” button.
Step 6 – Refresh (F5) the panel and start testing. 
Note – Once you deploy the tested jscript in the server remember to remove the local copy from the local machine. Otherwise M3 gives the priority to the script in the local machine not to the server. If so you may miss latest version of the script in the server. J

Happy scripting…. J