Tuesday, September 13, 2016

AnyPlayer Music Player - Android

Stylish, Powerful and Fast Music Player with elegant design. Music Player lets you manage all your music files quickly and easily .This audio player supports almost all types of mp3, mp4, 3gp, acc, flac, mid, ogg files and other audio formats. 
Easily browse and play music songs by genres, albums, artists, songs, playlists and folders. Enjoy high quality music playback experience with a unique equalizer, bass boosting, visualizer and ID3V2 mp3 tags. 
Get it on Google Play
  • Create your own play list as you wish. In each sub menu, you can control songs with your preferences. Six basic grouping of songs are available with simple sorting. 


  • Search any song in your mobile based on title, artist, or album
  • Adjust sounds in a convenient way, with easy yet powerful equalizer and bass booster. 
  • We don't have complicate settings menu, instead we have simplified the player. Want to sleep while listening to music. Set timer to switch off the player and start dreaming. 
  • Select any one of three widgets to your desktop. Sometimes notifications make life easy like this. Not only notification, use any sort of remote controllers to control the player, including your android wear. 
Please try our music player and don't forget to leave a comment to make it more simple and easy to use. Appreciate your help. 
Download AnyPlayer at Google Play
Get it on Google Play

Tuesday, June 30, 2015

M3 MashUp Overview

M3 mashup tool can be used to combine information from several M3 panels, several external sources and other M3 sources in to one panel. With mash up tool it is easy to connect different panels, details, call APIs, do localisations, and create customer lists to ISO client.

With this tool, it is easy to continue business flows without memorizing several different panels.
Let’s see some real life experience in M3, which makes life harder to the user.

Ex: -
  1.  See item details.  – User needs to remember MMS001, MMS002, MMS003, and PDS001 and so on.
  2. See Supplier details – Starting with CRS620, if you need financials you need to go to CRS624, addresses different related option, like wise.
  3.  Purchase order / Customer order/ Manufacturing order information – You need to always start with header and go in to line level

Likewise there can be several scenarios based on your business flow.


Using M3 mash up tool we can put these pieces in to one panel and make life easier to the user.


Sunday, May 31, 2015

PO pallet wise receiving

Question

Customer wanted to receive PO pallet wise (PPS300). But these items were not lot controlled. Their requirement was to receive pallets with different receiving numbers. Our initial try was to use API calls for each pallet. Latter we realized that in each API call receiving number changes as bellow,

1000003001, 1000004001, 1000005001

But we don’t want that since when it comes to put away we cannot put each and every receiving number. In each time user should be able to see all the pallets of one PO line under the same screen. In that case number series should be generated as bellow,

1000003001, 1000003002, 1000003003……n

So that user can see all the pallets we received under one PO line.

 Answer

We realized that when user receive PO lines with pallet quantities (partial quantities), receiving number changes in the desired way. So we came up with an automation which runs on the PPS300/B panel.

Main problem here is not to close PPS300 screen each time. Designing automation which follows same user operations would be the only possible option.

Step 1: 
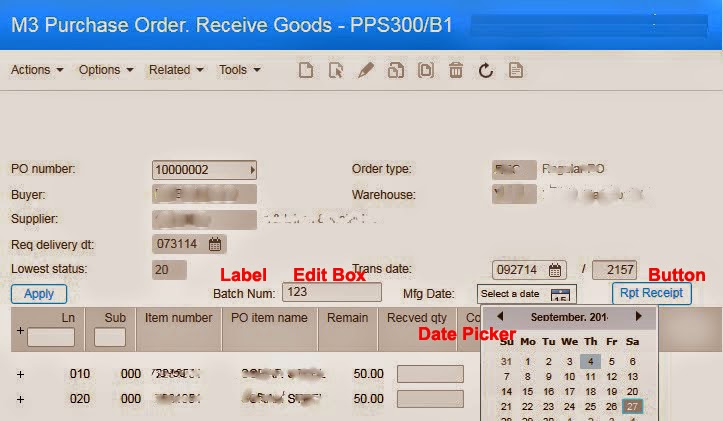
Set up input fields and buttons on the PPS300/B1 pannel.

Step 2: Initial validations before process starts.

Step 3: Processing the bulk (Receiving multiple pallets)

/******
Program - PPS300
Devloped - Aurora Devs
Requested - ******
Des - This script will GRN good based on pallet quantity.
******/
import System;
import System.Windows;
import System.Windows.Controls;
import MForms;
import Mango.UI;
import Lawson.M3.MI;
import System.Windows.Input;

package MForms.JScript {
   class PPS300_AutoRecipt {
   
  var controller;
  var debug;
  var content;
  public var loopCount;
  public var runLoopFor;
  var location;
  var packSize;
  public var partialPalet;
  var listControl;
  public var puno;
  public var item;
  public var line;
  public var batchNum;
  var batchL;
  public var mnfDate;
  var mnfDateL;
  var quantity;
  var listView;
  var linNumColumn;
  var lineClose: boolean = false;
  var linesWhenBreak=0 ;
   
      public function Init(element: Object, args: Object, controller : Object, debug : Object) {
         
   this.content  = controller.RenderEngine.Content;
   this.controller = controller;
   this.debug = debug;
    
   debug.WriteLine("Script Initializing.");
    
   var receivePalet = new Button();
   setButton(receivePalet, 60, 6 );   
   setLabel(batchL, "Batch Num:", 20, 6);
   batchNum= new  TextBox();
   setTextBox(batchNum,27, 6);
   
   setLabel(mnfDateL, "Mfg Date:", 39, 6);
   mnfDate = new DatePicker(); 
   setDate(mnfDate,46, 6);
      }
   //Adding button
   public function setButton(name, col, row ){
   name.Content = 'Rpt Receipt';
   name.ToolTip = 'Click here to automatically report pallets';
   name.HorizontalAlignment = HorizontalAlignment.Left;
   Grid.SetColumn(name, col);
   Grid.SetColumnSpan(name, 98);
   name.VerticalAlignment = VerticalAlignment.Top;
   Grid.SetRow(name, row);
   Grid.SetRowSpan(name, 23);
   controller.RenderEngine.Content.Children.Add(name);
   name.add_Click(OnClick_receivePalet);
   }
          //Adding the TEXT Box   
   public function setTextBox(name, col, row ){
    name.Text='';
    name.Width= 10* Configuration.CellWidth;
    name.Height= 15;//* Configuration.CellHeight;
     name.FontSize = 12;  
    name.HorizontalAlignment=HorizontalAlignment.Left;
    Grid.SetColumn(name,col);
    Grid.SetColumnSpan(name,98);
    name.VerticalAlignment=VerticalAlignment.Top;
    Grid.SetRow(name,row);
    Grid.SetRowSpan(name,23);      
    controller.RenderEngine.Content.Children.Add(name);
   
   
   }
   //Adding the Lable
   public function setLabel(variable, name, col, row){
    variable = new Label();
    variable.Content = name;
    variable.Padding = new Thickness(1);
    Grid.SetColumn(variable, col);
    Grid.SetRow(variable, row);
    Grid.SetColumnSpan(variable, 12);
    controller.RenderEngine.Content.Children.Add(variable);
   }
   //Adding date picker
   public function setDate(variable,  col, row){
   variable.Width= 10* Configuration.CellWidth;
    variable.Height= 20; 
    variable.FontSize = 10;  
    Grid.SetColumn(variable, col);
    Grid.SetRow(variable, row);
    Grid.SetColumnSpan(variable, 11);
    controller.RenderEngine.Content.Children.Add(variable);
   }
   
   // event handler for user clicks   
   function OnClick_receivePalet(sender: Object, e: RoutedEventArgs) {
   debug.WriteLine("clicked");
   puno = ScriptUtil.FindChild(content, "WWPUNO");
   listControl =controller.RenderEngine.ListControl;
   listView = listControl.ListView;
   var itemColumn = listControl.GetColumnIndexByName('ITNO');
   var locationColumn = listControl.GetColumnIndexByName('WHSL');
   var quantityColumn = listControl.GetColumnIndexByName('RVQA');
   linNumColumn = listControl.GetColumnIndexByName('PNLI');
   //debug.WriteLine("r--"+linNumColumn);
   var rowItems = listView.SelectedItems;
   var i= 0;
   partialPalet = 0;
   item = "";
   location = "";
   line = "";
   quantity = 0;
   for (var  row in rowItems) {
    item = row[itemColumn];  
    location = row[locationColumn];
    quantity = row[quantityColumn];
    line = row[linNumColumn];
    i++;     
   }
   
   if(i==0){
    MessageBox.Show('Please select a line!');
   } 
   else if(i==1){
    debug.WriteLine(item+" Location:-"+ location+" line-"+line);
    if(true == String.IsNullOrEmpty(location.Text)){
     MessageBox.Show('Location must be entered!');
    }
    else if(true == String.IsNullOrEmpty(quantity.Text)){
     MessageBox.Show('Quantity must be entered!');
    }
    else if((true == String.IsNullOrEmpty(batchNum.Text)) || (true == String.IsNullOrEmpty(mnfDate.Text))){
     MessageBox.Show('Batch number/ Mfg date must be entered!');
    }
    else{
     packSize = 0;
     debug.WriteLine("conditions made");
     retrieveContainer(item);
     debug.WriteLine("pack size="+packSize);
    }
   }
   else{
    MessageBox.Show('Please select only one line!');
   }
   
   }
  
   public function OnRequesting(sender : Object, e : CancelRequestEventArgs) {
   if((true == controller.RenderEngine.PanelHeader.EndsWith("PPS300/A"))
       || (true == controller.RenderEngine.PanelHeader.EndsWith("PPS300/E")))   // are we on panel A/E
   {
    var strError = checkForError();

     if(true != String.IsNullOrEmpty(strError)) {
      debug.WriteLine("there is a msg");
      CleanUp();
     }
   }
   
  
      }
   
     public function requestComplete(sender: Object, e: RequestEventArgs) 
   
    if(true == controller.RenderEngine.PanelHeader.EndsWith("PPS300/B1"))   // are we on panel B1
     {
      debug.WriteLine("came to B1");
      if((runLoopFor+2) == loopCount){
       CleanUp();
       if(lineClose){
       //loopCount
        MessageBox.Show('Reporting of '+ linesWhenBreak+' pallets is finished successfully, But process braked up since line is closed');
       }
       else{
        MessageBox.Show('Reporting of '+ (loopCount-2)+' pallets,\n and '+partialPalet+' unit/s, is finished successfully!');
       }
      }else{
       if(((runLoopFor+1) == loopCount) && (partialPalet == 0)){
        CleanUp();
           MessageBox.Show('Reporting of '+ runLoopFor+' pallets is finished successfully!');
       }else{
        listControl = controller.RenderEngine.ListControl;
        var lv = listControl.ListView;
        lv.SelectedIndex=0;
        controller.ListOption("2");
       }
      }
     }
    if(true == controller.RenderEngine.PanelHeader.EndsWith("PPS300/E"))   // are we on panel E
     {
      if((runLoopFor+1) == loopCount){
       packSize = partialPalet;
      }
      var lineInt: int = line;
      
      loopCount++;
      var pnliF = ScriptUtil.FindChild(content, "IBPNLI");
      var pnliInt: int = pnliF.Text;
      debug.WriteLine("came to E- line"+ line +"--"+ pnliF.Text+" lineint"+lineInt+" pnliF "+pnliInt);
      if(lineInt == pnliInt){
       var rvqaF = ScriptUtil.FindChild(content, "WBRVQA");
       var whslF = ScriptUtil.FindChild(content, "WLWHSL");
       var repnF = ScriptUtil.FindChild(content, "WWREPN");
       var camuF = ScriptUtil.FindChild(content, "WTCAMU");
       var prdtF = ScriptUtil.FindChild(content, "WLPRDT");
       var brefF = ScriptUtil.FindChild(content, "WLBREF");
       var lpudF = ScriptUtil.FindChild(content, "WBLPUD");
       
       rvqaF.Text = packSize;
       whslF.Text = location;
       camuF.Text = repnF.Text;
       brefF.Text = batchNum.Text;
       prdtF.Value =  mnfDate.SelectedDate;
       lineClose = false;
       controller.PressKey("ENTER");
      }
      else{
       linesWhenBreak = loopCount;
       loopCount = runLoopFor+2;
       lineClose = true;
       controller.PressKey("F12");
       
      }
      
     }
   
  }
  
  public function CleanUp() {
   
   controller.remove_RequestCompleted(requestComplete);
   controller.remove_Requesting(OnRequesting);
   debug.WriteLine("Cleaned up");
  }
  
  private function checkForError() {
   var strResult : String = null;
   var strStatusMessage : String = MForms.Runtime.Runtime(controller.Runtime).Result;  // objRuntime.Result;

   try {
    var iStartPosition : int = 0;

    iStartPosition = strStatusMessage.IndexOf("");

    // if Msg doesn't exist, then we didn't have an error
    if(-1 == iStartPosition) {
     // we are all good!
    }
    else {
     var iEndPosition : int = strStatusMessage.IndexOf("");
     if((-1 == iEndPosition) && (0 != iEndPosition)) {
      iEndPosition = strStatusMessage.length-1;
     }
     strResult = strStatusMessage.substring(iStartPosition+5, iEndPosition);
    }
   }
   catch(ex) {
    MessageBox.Show("checkForError() exception: " + ex.message);
   }

   return(strResult);
  }
  
  public function retrieveContainer(itemS) {
   try {
   

    debug.WriteLine("Starting validation for Container " );
    
    var api="MDBREADMI";  // Name of MI (general API)
    var trans = "GetMPACIT10";// Transaction name
     
    var record = new MIRecord();
    
    record["DXIT"]="1";  // item identity
    record["PACT"]="PALLET";  // packaging
    record["ITNO"] = itemS;  //item num
    MIWorker.Run(api, trans, record, OnResponse);  //call the API
    SetWaitCursor(true); //wait till the response is arrived 
    
   } catch (ex) {
    debug.WriteLine(ex);
   }
  }
  
  public function OnResponse(response : MIResponse) {
   debug.WriteLine("in1");
   packSize = 0;
   if (response.HasError) {
    debug.WriteLine("inError");
    debug.WriteLine("MIAccess error. " + response.Error.ToString());
    //return;
   }else{
    debug.WriteLine("inProcess");
    var d1qtR;
    var d2qtR;
    var d3qtR;
    var itnoR = "";
    d1qtR = response.Item.GetString("D1QT"); //reading form the MI response
    d2qtR = response.Item.GetString("D2QT");
    d3qtR = response.Item.GetString("D3QT");
    itnoR = response.Item.GetString("ITNO");
    debug.WriteLine("a"+d1qtR+"  b= "+ itnoR + "itno - "+item);
    
    if((itnoR == item) && (d1qtR > 0.0) ){
     debug.WriteLine("pack qty =1="+d1qtR);
     var withoutZero: float = d1qtR;
     if(withoutZero <= quantity.Text){
      packSize = withoutZero;
      debug.WriteLine("pack qty =2="+packSize);
      CheckBatchQty();
     }
     else{
      MessageBox.Show('Entered Qty is less than pallet Qty!');
     }
     
    }
   }
   debug.WriteLine("out");
   SetWaitCursor(false);
   
  }
  
  public function runMainProcess(){
   var reportingQty = quantity.Text;
   partialPalet = reportingQty%packSize;
   runLoopFor = (reportingQty-partialPalet)/packSize;
   debug.WriteLine("run loop for -"+ runLoopFor);
   loopCount = 1;
   var gvGridView = listView.View;
   gvGridView.Columns[linNumColumn].Header.Content.Children[1].Text = line;
   controller.PressKey("ENTER");
   var porceed = ConfirmDialog.ShowQuestionDialog("Proceed?","Package size: "+packSize+"\nNumber of pallets: "+runLoopFor+"\nQty of partial pallet: "+partialPalet
   +"\nBatch Num: "+batchNum.Text+"\nManufacture Date: "+mnfDate.Text);

    if (porceed){
     listControl =controller.RenderEngine.ListControl;
     listView = listControl.ListView;
     //gvGridView = listView.View;
     debug.WriteLine("proceed");
     listView.SelectedIndex=0;
     controller.add_Requesting(OnRequesting);
     controller.add_RequestCompleted(requestComplete);
     controller.ListOption("2");
    }
    else{
     debug.WriteLine("cancel");
     //break;
    }
  
  }
  
  public function CheckBatchQty() {
   try {
   

    debug.WriteLine("Starting validation for supplier " );
    //isValidating = true;
    var CONO = UserContext.CurrentCompany;
    var api="PPS001MI";  // Name of MI (general API)
    var trans = "GetLine";// Transaction name
     
    var record = new MIRecord();
    
    record["CONO"]= CONO;  // Company
    record["PUNO"] = puno.Text;  //PO num
    record["PNLI"] = line;  //PO Line
    
    
    var parameters = new MIParameters();
        parameters.OutputFields = ['CFQA', 'ORQA'];
    
    
    MIWorker.Run(api, trans, record, OnResponseCheckBatchQty,parameters );
    SetWaitCursor(true); //wait till the response is arrived 
    //this.test1() ;  //test case without API call
   } catch (ex) {
    debug.WriteLine(ex);
   }
  }
  
  public function OnResponseCheckBatchQty(response : MIResponse) {
   SetWaitCursor(false);
   if (response.HasError) {
    debug.WriteLine("MIAccess error. " + response.Error.ToString());
    MessageBox.Show('Somthing wrong with the API transaction or the provided po get line');
     
    return;
   }
   else{

    var cfqa = "";
    var orqa = "";
    cfqa = response.Item.GetString("CFQA"); //reading form the MI response
    orqa = response.Item.GetString("ORQA");
    
    //debug.WriteLine("cfqa- "+ cfqa+ " orqa - "+ orqa + " quantity.Text- "+quantity.Text);
    //quantity
    if(cfqa > 0){
     if(quantity.Text > cfqa){
      MessageBox.Show('Entered Qty is greater than the ordered/confirmed qty !');
     }
    }
    else{
     if(quantity.Text > orqa){
      MessageBox.Show('Entered Qty is greater than the ordered/confirmed qty !');
     }
    }
    runMainProcess();
   
   }  
  }

  
  public function SetWaitCursor(wait) {
   var element = controller.Host.Implementation;
   element.Cursor = wait ? Cursors.Wait : Cursors.Arrow;
   element.ForceCursor = true;
  }  
 }
}

Monday, January 19, 2015

Android Music player AnyPlayer

Enjoy high quality music playback experience with a unique equalizer, bass boosting, for mp3, mp4, 3gp, acc, flac, mid, ogg, and etc with this music player. Any player is designed for both simple and advanced users. It has simple interface with rich graphics which enables the user for smooth navigation through the music player. Enjoy high-quality mobile music playback experience. NOTE: Product is for ANDROID 3.0+ devices.


Get Pro - Get it on Google Play

Get Trial (30days) - Get it on Google Play


Get the user manual -

Features:

See feature demo

* Adjust the effect as you want – 5 bands Equalizer, Bass boost and volume knob.
* Music Player automatically detects all the music files in your phone, and add to relevant music lists
* Music Player Supports for playback of the most common music format such as mp3, mp4, 3gp, aac, flac, mid, ogg, etc.
* Music Player is available on 8 famous languages, ENGLISH, SPANISH, FRENCH, GERMAN, ITALIAN, RUSSIAN, CHINESE,PORTUGUESE and JAPANESE.
* Browse and play your music by ALBUMS, ARTISTS, FOLDERS, GENRES, ALL SONGS, and PLAYLISTS,
* LOCK SCREEN widget of size 4x1
* Music Player gives you a choice of 3 different home screen WIDGETS (4x1, 2x2, 4x4) with album art work, controllers and easy access to the player.
* NOTIFICATION STATUS with album art work and controllers.
*Automatically SLEEP PLAYER after some time with music fades out effect.
* HEADSET support with headset buttons and with bass boosting.
* Music Player SEARCH your favorite song based on title, album and artist.
* SWIPE gestures on home page (swipe left right- swipe album art to play next/ previous, swipe up /pause) and playlist.
* Create/Edit/Delete/Rename your favorite playlists.
* Mange song Queue as you want and save it as playlist.
* Share your favorite songs with your friends with Bluetooth and other Medias.
* If the device is equipped with Bluetooth, don’t hesitate to enjoy Bluetooth streaming.
*Equalizer / bass boost settings will automatically save your preferences for the next time.
Visit our web site

Thursday, November 6, 2014

Add buttons / Text box / Label / Date picker to a panel.

We can add various controllers to M3 user interface using JScripting. Today I’m going to show some simple mechanisms you can use to add a button, label, and editable text box.


Button 

Buttons can be used for various activities such as,
           1. Call actions or related options with additional validations
           2. Call an API and fill some data
           3. Load some data from a text file and load them to a list view
           4. Call SQL (Not recommended)
           5. Automate a form and etc…..

Normally we use a button for a user driven activity and therefore initial triggering point would be the users’ click. Initializing of a button can be done by the following code,
 var NameOfButton = new Button(); 
Once initializing a button, we need to set button properties such as name, span, alignment, controls and finally we need to add that to the current controller.
//Name you want to show in the button
NameOfButton.Content = 'Click Me!;
//tooltip to give a basic understanding on what it does.
NameOfButton.ToolTip = 'Click here to automatically report pallets';
//set horizontal alignment and span of the button on the grid
NameOfButton.HorizontalAlignment = HorizontalAlignment.Left;
Grid.SetColumn(NameOfButton, 60);
Grid.SetColumnSpan(NameOfButton, 98);
//set vertical alignment and span of the button on the grid
NameOfButton.VerticalAlignment = VerticalAlignment.Top;
Grid.SetRow(NameOfButton, 6);
Grid.SetRowSpan(NameOfButton, 23);
//add this button to the current controller. This is one of most important task of the process. If you don’t add that to the current controller you want be able to see this button on your grid. 
controller.RenderEngine.Content.Children.Add(NameOfButton);
//finally adds an event to this button. This will be responsible for handling events for this button.
NameOfButton.add_Click(OnClick_NameOfButton);
Once the button is constructed, we are good to design the click event which does the work for this button. Ok let’s see how we can create “OnClick_NameOfButton” event.
function OnClick_ NameOfButton (sender: Object, e: RoutedEventArgs) {
  debug.WriteLine("clicked");
  var puno = ScriptUtil.FindChild(content, "WWPUNO");
  RetrivePODataForPONum(puno);
} 
This would capture the user click and do the task for the user. Using this method you can call any method so easily.

 Text Box 
In some scripts we need to get some input value from the user. In that case we can use text box. As previous, first you need to initialize the object and then define respective properties as required.
//initialize the object
var EditBoxName = new  TextBox();  
//if you want to set default value, you can set it here               
 EditBoxName.Text='';
//set width, height and font size. Note that we can uses cell width and height from the configuration itself.
 EditBoxName.Width= 10* Configuration.CellWidth;
 EditBoxName.Height= 15;
EditBoxName.FontSize = 12;  
//set vertical/horizontal alignment with span and size.
EditBoxName.HorizontalAlignment=HorizontalAlignment.Left;
Grid.SetColumn(EditBoxName,20);
Grid.SetColumnSpan(EditBoxName,20);
EditBoxName.VerticalAlignment=VerticalAlignment.Top;
Grid.SetRow(EditBoxName,row);
Grid.SetRowSpan(EditBoxName,23);      
//Finally add this to the grid
controller.RenderEngine.Content.Children.Add(EditBoxName);
Once you define a variable for the edit box you can read the editable text for processing using following property.
 EditBoxName.Text 

Label

 You can add non editable text to M3 using labels as follows.
//initialize the vareable
var labelName = new Label();
//set the name
labelName.Content = name;
labelName.Padding = new Thickness(1);
//set label on the grid
Grid.SetColumn(labelName, col);
Grid.SetRow(labelName, row);
Grid.SetColumnSpan(labelName, 12);
//attach to the current controller
controller.RenderEngine.Content.Children.Add(labelName);

Date picker 

You can also use data picker in a jscript by using following simple code.
// initialize the variable
var variable = new DatePicker(); 
//set width/height
variable.Width= 10* Configuration.CellWidth;
variable.Height= 20; 
variable.FontSize = 10;  
//set date picker on the grid
Grid.SetColumn(variable, col);
Grid.SetRow(variable, row);
Grid.SetColumnSpan(variable, 11);
//attach the date picker to the current controller
controller.RenderEngine.Content.Children.Add(variable);

Thursday, October 2, 2014

Hello M3 Jscript World!!

Hello Friends,

It is really easy to start with jscripting in M3. Just open your jscript tool (Refer my previous blog for more details) Once you are done with that go to File -> New Script and create new script. It will generate the basic class structure for you. If you want to read a field in a M3 panel, you can use following code snippet.

var OType=ScriptUtil.FindChild(content, "QOMAUN");

You can use properties like, 1. Text – to view the field text. 2. IsEnabled (Boolean) – to enable/disable a field. If you want to give view (non-editable) access to a user for a filed, you can set “IsEnabled” property to “false”.

import System;
import System.Windows;
import System.Windows.Controls;
import MForms;

package MForms.JScript {
   class HelloWorld {
   
   var content;
   var controler;
   var debug;
   
      public function Init(element: Object, args: Object, controller : Object, debug : Object) {
         debug.WriteLine("Hello World!.");
         
         this.content = controller.RenderEngine.Content;
         this.controler = controller;
         this.debug = debug;
         
         var OType=ScriptUtil.FindChild(content, "QOMAUN");
          
   debug.WriteLine("Hello Field - "+ OType.Text + ", let me dissable you");
   
   //OType.IsEnabled = false;
   DisableField(OType);
   
      }
      
      public function DisableField(fieldObj){
        fieldObj.IsEnabled = false;
        debug.WriteLine("Dissabled!! ");
      }
   }
}

Saturday, September 27, 2014

How to test Jscript in the Local machine for Lawson/Infor M3

You can test your jscript for Infor M3, using your local machine in 2 different ways.

1.  Using in-build script tool
2.   By configuring regedit of your local machine

1.  Using in-build script tool 

Step 1 – Type “mforms://jscript” in the start/search box on the title bar. And press enter
Step 2 – Once you open the script tool you can either,
open your script from a local folder (File -> Open)
 OR
copy and paste the code on the script tool.
Step 3 – Open the panel you want to check the personalization for. (Ex – PDS010/B) Then hit “Refresh” button on the Script tool. Once you do so, you can select the relevant panel (communicate with the programmer and verify the correct panel to start with) from the drop down before the “Refresh” button.

Step 4 – Once you are done with the above, press “Run” button on the script tool.
Step 5 – Go to the panel which you select as the host for the script and test the personalization.

Note – This will be effective until you close the selected panel or program. If you want to test it with different scenarios with one time attachment, it is recommended to use the second method.

2.  By configuring regedit of your local machine

Using this mechanism you can test you personalization only by opening the program each time. You don’t have to configure or run special program after that.
Step 1 – Download the following zip file and unzip it. Just double click it to run the registry file. Allow the registry file to run. Please select the correct zip file as per the M3 version. Once you get the success message please proceed with next step.
AuroraDeves_v13
AuroraDeves_v10

Step 2 – Create a new folder “C:\Aurora_Devs\Script\” in your c: drive
Step 3 – Copy and paste the jscript to that folder.
Step 4 – Open LSO and go the relevant program you wanna check the jscript. (Ex- PPS300/B)
Step 5 – Go to Tools -> Personalize-> Script

Add the script name (except .js) and press “Add”

Once you attach the jscript always remember to hit “Save” button.
Step 6 – Refresh (F5) the panel and start testing. 
Note – Once you deploy the tested jscript in the server remember to remove the local copy from the local machine. Otherwise M3 gives the priority to the script in the local machine not to the server. If so you may miss latest version of the script in the server. J

Happy scripting…. J